

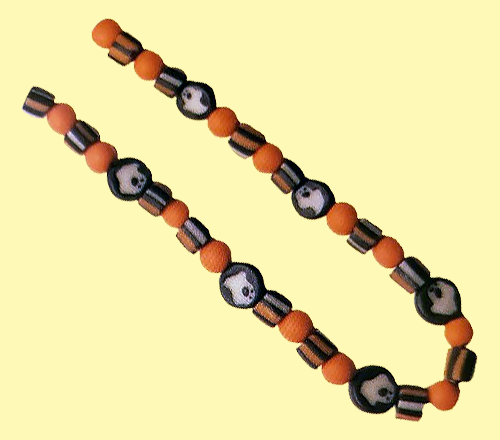
Ghost Beads
[originally from The Incredible Clay Book]
[This craft project uses polymer clay, preferably Sculpey, as its medium. It may take a few tries to get it right if you're new to clay, but it's lots of fun!]
The ultimate cane technique. Putting a picture inside a log is where art and beadmaking truly overlap. Professionals create incredibly elaborate beads using this technique, which we illustrate here with a simple (but charming!) ghost. Once you've learned the basics of this style, you'll be a bead artist.
 What you'll need:
- HOW MUCH CLAY? 1/4 block each of white and black
- BAKE: 10 minutes / 275°
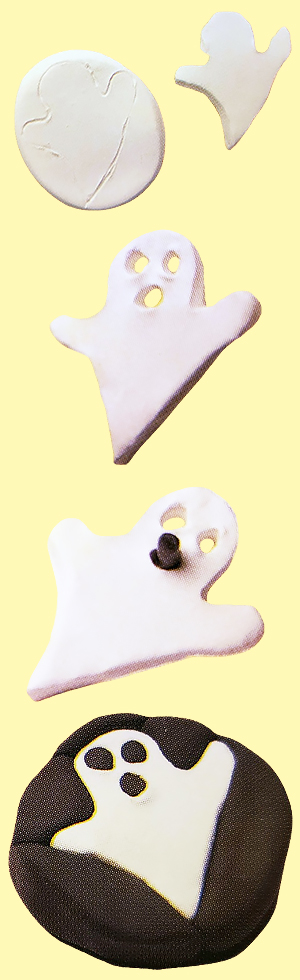
1. Make a paper pattern by tracing our ghost at far right. [print out the pattern!]
2. Roll out a slab of white clay at least 1/2" thick.
3. Place the ghost pattern on the clay and trace around it with a toothpick. Cut along the line with a paring knife. Smooth the rough edges with your fingers or a toothpick.
4. Use a toothpick to poke holes for the eyes and mouth. Work the toothpick in a circular motion until the hole is big enough to fill with black clay.
5. Put your ghost in the freezer for about 20 minutes, until VERY firm. (This will make it a lot easier to place the eyes and mouth.)
6. Roll a thin rope of black clay; make sure the rope is narrow enough to go through the eye and mouth holes. Poke the rope into the holes, using a toothpick to pack the clay in until the holes are completely filled.
 7. Surround the ghost with pieces of black clay to fit snugly around the ghost's edges. Make sure that all the black clay is the same thickness as the ghost, 1/2."
8. Trim around the black clay to make a round circle. Put your circle in the refrigerator for about half an hour to bring the design to uniform firmness.
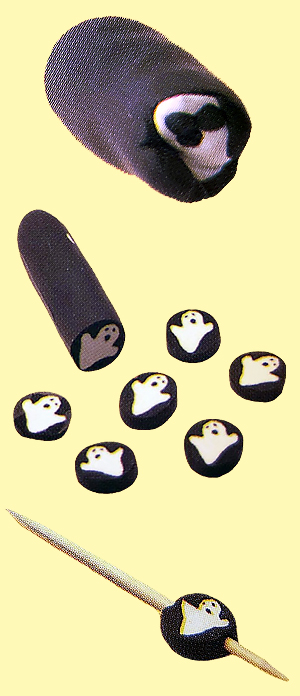
9. Stand your circle upright and carefully roll its edges, first with your fingers, then between your two hands or on a table. The design will start to lengthen into a log. (The ghost on each end will look weirdly distorted—this is normal. The end pieces of a cane usually don't hold the design very well.)
10. When your roll is the desired thickness, let it rest for several hours or put it in the fridge to firm up. Then slice off pieces of the log, using a very sharp blade. (Kids, here's where you need your grown-up assistant.)
11. Poke a hole side to side through each bead [with a toothpick] and bake.