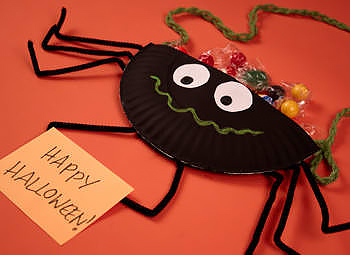

Spider Candy Holder
by Amanda Formaro
[originally from Kaboose.com]

 This cute little spider candy holder hangs on a doorknob just waiting to give you treats. You can also fill it with other items such as pencils, erasers, temporary tattoos, and fun plastic spider rings.
What you'll need:
- 9" paper plate
- 4 black chenille stems
- Three 36"-long pieces of green yarn
- Black, white and light green acrylic paint
- 3" x 5" piece of orange construction paper
- Black marker
- White craft glue
- Scissors
How to make it:
1. Paint paper plate with black paint and let dry.
2. Fold paper plate in half and cut along the crease.
3. Pipe glue along the rounded edges of the two pieces of plate and stick the plates together, unpainted sides should be facing each other. Do not glue the cut sides; this is the opening of your plate pocket.
4. Cut chenille stems in half.
5. Set aside two of the chenille stems. Bend the ends of the remaining chenille stems, about 1" at each end. Bend one to the left and the other to the right. For the remaining two chenille stems, bend one end about 1" and the other end about 2".
 6. Place plate pocket in front of you, with the open end at the top. Glue three chenille legs on the left (glue to the underside) and the other three on the right.
7. Take the remaining two stems and glue the 2" bend under the plate about 1/3 of the way down from the left, and 1/3 of the way down on the right. Allow to dry.
8. Make eyes from white construction paper, or paint a section of any color construction paper with white paint. Use a black marker or black paint to draw in the pupils, then glue eyes on the body.
9. Paint a wiggly smile on the front of the plate using green paint.
10. Write "Happy Halloween!" on the orange construction paper with black marker. Glue the paper underneath the spider’s "hands" so that it appears that it is holding the sign.
11. To make the handle, line all three pieces of yarn up together and tie one end in a knot. Braid the strands together and knot at the other end.
12. Open the pocket and pipe some glue into the creases then press the ends of the yarn handle inside and let dry.
12. Fill with candy or other treats and hang.
Tips:
1. Instead of making the eyes you can use large wiggle eyes.
2. If you prefer to skip braiding the yarn, you can cut a handle from craft foam.
3. Chenille stems are available at your local discount department store or craft store. Watch for sales following each holiday as you can pick up theme colors on clearance (green and red – Christmas, etc).